 December 20, 2025December 20, 2025
 December 20, 2025
 December 20, 2025
 December 20, 2025
In this tutorial, we devise how to orchestrate a fully functional, tool-using medical prior-authorization agent powered by Gemini. We walk through each component step by step, from securely configuring the model to building realistic external tools and finally constructing an intelligent agent loop that reasons, acts, and responds entirely through structured JSON. As we progress, we see how the system thinks, retrieves evidence, and interacts with simulated medical systems to complete a complex workflow. Check out the .
!pip install -q -U google-generative-ai
import google.generativeai as genai
from google.colab import userdata
import os
import getpass
import json
import time
try:
GOOGLE_API_KEY = userdata.get('GOOGLE_API_KEY')
except:
print("Please enter your Google API Key:")
GOOGLE_API_KEY = getpass.getpass("API Key: ")
genai.configure(api_key=GOOGLE_API_KEY)
print("n Scanning for available models...")
available_models = [m.name for m in genai.list_models()]
target_model = ""
if 'models/gemini-1.5-flash' in available_models:
target_model = 'gemini-1.5-flash'
elif 'models/gemini-1.5-flash-001' in available_models:
target_model = 'gemini-1.5-flash-001'
elif 'models/gemini-pro' in available_models:
target_model = 'gemini-pro'
else:
for m in available_models:
if 'generateContent' in genai.get_model(m).supported_generation_methods:
target_model = m
break
if not target_model:
raise ValueError("
Scanning for available models...")
available_models = [m.name for m in genai.list_models()]
target_model = ""
if 'models/gemini-1.5-flash' in available_models:
target_model = 'gemini-1.5-flash'
elif 'models/gemini-1.5-flash-001' in available_models:
target_model = 'gemini-1.5-flash-001'
elif 'models/gemini-pro' in available_models:
target_model = 'gemini-pro'
else:
for m in available_models:
if 'generateContent' in genai.get_model(m).supported_generation_methods:
target_model = m
break
if not target_model:
raise ValueError(" No text generation models found for this API key.")
print(f"
No text generation models found for this API key.")
print(f" Selected Model: {target_model}")
model = genai.GenerativeModel(target_model)
Selected Model: {target_model}")
model = genai.GenerativeModel(target_model)We set up our environment and automatically detect the best available Gemini model. We configure the API key securely and let the system choose the most capable model without hardcoding anything. This ensures that we start the tutorial with a clean, flexible, and reliable foundation. Check out the .
class MedicalTools:
def __init__(self):
self.ehr_docs = [
"Patient: John Doe | DOB: 1980-05-12",
"Visit 2023-01-10: Diagnosed with Type 2 Diabetes. Prescribed Metformin.",
"Visit 2023-04-15: Patient reports severe GI distress with Metformin. Discontinued.",
"Visit 2023-04-20: BMI recorded at 32.5. A1C is 8.4%.",
"Visit 2023-05-01: Doctor recommends starting Ozempic (Semaglutide)."
]
def search_ehr(self, query):
print(f"  [Tool] Searching EHR for: '{query}'...")
results = [doc for doc in self.ehr_docs if any(q.lower() in doc.lower() for q in query.split())]
if not results:
return "No records found."
return "n".join(results)
def submit_prior_auth(self, drug_name, justification):
print(f"
[Tool] Searching EHR for: '{query}'...")
results = [doc for doc in self.ehr_docs if any(q.lower() in doc.lower() for q in query.split())]
if not results:
return "No records found."
return "n".join(results)
def submit_prior_auth(self, drug_name, justification):
print(f"  [Tool] Submitting claim for {drug_name}...")
justification_lower = justification.lower()
if "metformin" in justification_lower and ("discontinued" in justification_lower or "intolerance" in justification_lower):
if "bmi" in justification_lower and "32" in justification_lower:
return "SUCCESS: Authorization Approved. Auth ID: #998877"
return "DENIED: Policy requires proof of (1) Metformin failure and (2) BMI > 30."
[Tool] Submitting claim for {drug_name}...")
justification_lower = justification.lower()
if "metformin" in justification_lower and ("discontinued" in justification_lower or "intolerance" in justification_lower):
if "bmi" in justification_lower and "32" in justification_lower:
return "SUCCESS: Authorization Approved. Auth ID: #998877"
return "DENIED: Policy requires proof of (1) Metformin failure and (2) BMI > 30."We define the medical tools that our agent can use during the workflow. We simulate an EHR search and a prior-authorization submission system so the agent has real actions to perform. By doing this, we ground the agent’s reasoning in tool-enabled interactions rather than plain text generation. Check out the .
class AgenticSystem:
   def __init__(self, model, tools):
       self.model = model
       self.tools = tools
       self.history = []
       self.max_steps = 6

       self.system_prompt = """
       You are an expert Medical Prior Authorization Agent.
       Your goal is to get approval for a medical procedure/drug.

       You have access to these tools:
       1. search_ehr(query)
       2. submit_prior_auth(drug_name, justification)


       RULES:
       1. ALWAYS think before you act.
       2. You MUST output your response in STRICT JSON format:
          {
            "thought": "Your reasoning here",
            "action": "tool_name_or_finish",
            "action_input": "argument_string_or_dict"
          }
       3. Do not guess patient data. Use 'search_ehr'.
       4. If you have the evidence, use 'submit_prior_auth'.
       5. If the task is done, use action "finish".
       """
We initialize the agent and provide its full system prompt. We define the rules, the JSON response format, and the expectation that the agent must think before acting. This gives us a controlled, deterministic structure for building a safe and traceable agent loop. Check out the .
def execute_tool(self, action_name, action_input):
if action_name == "search_ehr":
return self.tools.search_ehr(action_input)
elif action_name == "submit_prior_auth":
if isinstance(action_input, str):
return "Error: submit_prior_auth requires a dictionary."
return self.tools.submit_prior_auth(**action_input)
else:
return "Error: Unknown tool."
def run(self, objective):
print(f" AGENT STARTING. Objective: {objective}n" + "-"*50)
self.history.append(f"User: {objective}")
for i in range(self.max_steps):
print(f"n
AGENT STARTING. Objective: {objective}n" + "-"*50)
self.history.append(f"User: {objective}")
for i in range(self.max_steps):
print(f"n STEP {i+1}")
prompt = self.system_prompt + "nnHistory:n" + "n".join(self.history) + "nnNext JSON:"
try:
response = self.model.generate_content(prompt)
text_response = response.text.strip().replace("```json", "").replace("```", "")
agent_decision = json.loads(text_response)
except Exception as e:
print(f"
STEP {i+1}")
prompt = self.system_prompt + "nnHistory:n" + "n".join(self.history) + "nnNext JSON:"
try:
response = self.model.generate_content(prompt)
text_response = response.text.strip().replace("```json", "").replace("```", "")
agent_decision = json.loads(text_response)
except Exception as e:
print(f"  Error parsing AI response. Retrying... ({e})")
continue
print(f"
Error parsing AI response. Retrying... ({e})")
continue
print(f"  THOUGHT: {agent_decision['thought']}")
print(f"
THOUGHT: {agent_decision['thought']}")
print(f"  ACTION: {agent_decision['action']}")
if agent_decision['action'] == "finish":
print(f"n TASK COMPLETED: {agent_decision['action_input']}")
break
tool_result = self.execute_tool(agent_decision['action'], agent_decision['action_input'])
print(f"
ACTION: {agent_decision['action']}")
if agent_decision['action'] == "finish":
print(f"n TASK COMPLETED: {agent_decision['action_input']}")
break
tool_result = self.execute_tool(agent_decision['action'], agent_decision['action_input'])
print(f"  OBSERVATION: {tool_result}")
self.history.append(f"Assistant: {text_response}")
self.history.append(f"System: {tool_result}")
if "SUCCESS" in str(tool_result):
print("n
OBSERVATION: {tool_result}")
self.history.append(f"Assistant: {text_response}")
self.history.append(f"System: {tool_result}")
if "SUCCESS" in str(tool_result):
print("n SUCCESS! The Agent successfully navigated the insurance portal.")
break
SUCCESS! The Agent successfully navigated the insurance portal.")
breakWe implement the core agent loop where reasoning, tool execution, and observations happen step by step. We watch the agent decide its next action, execute tools, update history, and evaluate success conditions. This is where the agent truly comes alive and performs iterative reasoning. Check out the .
tools_instance = MedicalTools()
agent = AgenticSystem(model, tools_instance)
agent.run("Please get prior authorization for Ozempic for patient John Doe.")
We instantiate the tools and agent, then run the entire system end-to-end with a real objective. We see the full workflow unfold as the agent navigates through medical history, validates evidence, and attempts prior authorization. This final snippet demonstrates the complete pipeline working seamlessly.
In conclusion, we reflect on how this compact yet powerful framework enables us to design real-world agentic behaviors that go beyond simple text responses. We watch our agent plan, consult tools, gather evidence, and ultimately complete a structured insurance authorization task, entirely through autonomous reasoning. It provides confidence that we can now expand the system with additional tools, stronger policies, domain-specific logic, or even multi-agent collaboration.
Check out the . Feel free to check out our . Also, feel free to follow us on and don’t forget to join our and Subscribe to .
The post appeared first on .
 December 20, 2025
In today’s episode of Uncanny Valley, we dive into five stories—from AI to DOGE—that encapsulate the year and give us clues as to what might unfold in 2026.
 December 19, 2025
In this episode, we look back at 2025 and look ahead to what’s happening in 2026—including what’s in store for Uncanny Valley.
 December 19, 2025
Mistral AI has released Mistral OCR 3, its latest optical character recognition service that powers the company’s Document AI stack. The model, named as mistral-ocr-2512, is built to extract interleaved text and images from PDFs and other documents while preserving structure, and it does this at an aggressive price of $2 per 1,000 pages with a 50% discount when used through the Batch API.
Mistral OCR 3 targets typical enterprise document workloads. The model is tuned for forms, scanned documents, complex tables, and handwriting. It is evaluated on internal benchmarks drawn from real business use cases, where it achieves a 74% overall win rate over Mistral OCR 2 across these document categories using a fuzzy match metric against ground truth.
The model outputs markdown that preserves document layout, and when table formatting is enabled, it enriches the output with HTML based table representations. This combination gives downstream systems both the content and the structural information that is needed for retrieval pipelines, analytics, and agent workflows.
OCR 3 sits inside Mistral Document AI, the company’s document processing capability that combines OCR with structured data extraction and Document QnA.
It now powers the Document AI Playground in Mistral AI Studio. In this interface, users upload PDFs or images and get back either clean text or structured JSON without writing code. The same underlying OCR pipeline is accessible via the public API, which allows teams to move from interactive exploration to production workloads without changing the core model.
The OCR processor accepts multiple document formats through a single API. The document field can point to:
document_url for PDFs, pptx, docx and moreimage_url for image types such as png, jpeg or avifThis is documented in the OCR Processor section of Mistral’s Document AI docs.
The response is a JSON object with a pages array. Each page contains an index, a markdown string, a list of images, a list of tables when table_format="html" is used, detected hyperlinks, optional header and footer fields when header or footer extraction is enabled, and a dimensions object with page size. There is also a document_annotation field for structured annotations and a usage_info block for accounting information.
When images and HTML tables are extracted, the markdown includes placeholders such as  and [tbl-3.html](tbl-3.html). These placeholders are mapped back to actual content using the images and tables arrays in the response, which simplifies downstream reconstruction.
Mistral OCR 3 introduces several concrete upgrades relative to OCR 2. The public release notes emphasize four main areas.
colspan and rowspan tags so that layout is preserved.The OCR 3 model card lists pricing at $2 per 1,000 pages for standard OCR and $3 per 1,000 annotated pages when structured annotations are used.
Mistral also exposes OCR 3 through its Batch Inference API /v1/batch, which is documented under the batching section of the platform. Batch processing halves the effective OCR price to $1 per 1,000 pages by applying a 50% discount for jobs that run through the batch pipeline.
The model integrates with two important features on the same endpoint, Annotations – Structured and BBox Extraction. These allow developers to attach schema driven labels to regions of a document and get bounding boxes for text and other elements, which is useful when mapping content into downstream systems or UI overlays.
mistral-ocr-2512, is the new OCR service that powers Mistral’s Document AI stack for page based document understanding. /v1/ocr endpoint or SDK, passing PDFs as document_url and images such as png or jpeg as image_url, and can enable options like HTML table output, header or footer extraction, and base64 images in the response. Check out the . Feel free to check out our . Also, feel free to follow us on and don’t forget to join our and Subscribe to .
The post appeared first on .
 December 19, 2025
From dead crabs to shredded bed sheets, fraudsters are using fake photos and videos to get their money back from ecommerce sites.
December 19, 2025
In this tutorial, we build a fully functional event-driven workflow using , treating messaging as a core architectural capability. We walk through step by step the setup of exchanges, routing keys, background workers, and concurrent producers, allowing us to observe a real distributed system. As we implement each component, we see how clean message flow, asynchronous processing, and routing patterns give us the same power that production microservices rely on every day. Check out the .
!pip install kombu


import threading
import time
import logging
import uuid
import datetime
import sys


from kombu import Connection, Exchange, Queue, Producer, Consumer
from kombu.mixins import ConsumerMixin


logging.basicConfig(
   level=logging.INFO,
   format='%(message)s',
   handlers=[logging.StreamHandler(sys.stdout)],
   force=True
)
logger = logging.getLogger(__name__)


BROKER_URL = "memory://localhost/"
We begin by installing Kombu, importing dependencies, and configuring logging so we can clearly see every message flowing through the system. We also set the in-memory broker URL, allowing us to run everything locally in Colab without needing RabbitMQ. This setup forms the foundation for our distributed messaging workflow. Check out the .
media_exchange = Exchange('media_exchange', type='topic', durable=True)


task_queues = [
   Queue('video_queue', media_exchange, routing_key='video.#'),
   Queue('audit_queue', media_exchange, routing_key='#'),
]
We define a topic exchange to flexibly route messages using wildcard patterns. We also create two queues: one dedicated to video-related tasks and another audit queue that listens to everything. Using topic routing, we can precisely control how messages flow across the system. Check out the .
class Worker(ConsumerMixin):
def __init__(self, connection, queues):
self.connection = connection
self.queues = queues
self.should_stop = False
def get_consumers(self, Consumer, channel):
return [
Consumer(queues=self.queues,
callbacks=[self.on_message],
accept=['json'],
prefetch_count=1)
]
def on_message(self, body, message):
routing_key = message.delivery_info['routing_key']
payload_id = body.get('id', 'unknown')
logger.info(f"n RECEIVED MSG via key: [{routing_key}]")
logger.info(f" Payload ID: {payload_id}")
try:
if 'video' in routing_key:
self.process_video(body)
elif 'audit' in routing_key:
logger.info(" [Audit] Logging event...")
message.ack()
logger.info(f" ACKNOWLEDGED")
except Exception as e:
logger.error(f" ERROR: {e}")
def process_video(self, body):
logger.info("
RECEIVED MSG via key: [{routing_key}]")
logger.info(f" Payload ID: {payload_id}")
try:
if 'video' in routing_key:
self.process_video(body)
elif 'audit' in routing_key:
logger.info(" [Audit] Logging event...")
message.ack()
logger.info(f" ACKNOWLEDGED")
except Exception as e:
logger.error(f" ERROR: {e}")
def process_video(self, body):
logger.info("  [Processor] Transcoding video (Simulating work...)")
time.sleep(0.5)
[Processor] Transcoding video (Simulating work...)")
time.sleep(0.5)We implement a custom worker using Kombu’s ConsumerMixin to run it in a background thread. In the message callback, we inspect the routing key, invoke the appropriate processing function, and acknowledge the message. This worker architecture gives us clean, concurrent message consumption with full control. Check out the .
def publish_messages(connection):
producer = Producer(connection)
tasks = [
('video.upload', {'file': 'movie.mp4'}),
('user.login', {'user': 'admin'}),
]
logger.info("n PRODUCER: Starting to publish messages...")
for r_key, data in tasks:
data['id'] = str(uuid.uuid4())[:8]
logger.info(f" SENDING: {r_key} -> {data}")
producer.publish(
data,
exchange=media_exchange,
routing_key=r_key,
serializer='json'
)
time.sleep(1.5)
logger.info("
PRODUCER: Starting to publish messages...")
for r_key, data in tasks:
data['id'] = str(uuid.uuid4())[:8]
logger.info(f" SENDING: {r_key} -> {data}")
producer.publish(
data,
exchange=media_exchange,
routing_key=r_key,
serializer='json'
)
time.sleep(1.5)
logger.info(" PRODUCER: Done.")
We now build a producer that sends structured JSON payloads into the exchange with different routing keys. We generate unique IDs for each event and observe how they are routed to other queues. This mirrors real-world microservice event publishing, where producers and consumers remain decoupled. Check out the .
def run_example():
   with Connection(BROKER_URL) as conn:
       worker = Worker(conn, task_queues)
       worker_thread = threading.Thread(target=worker.run)
       worker_thread.daemon = True
       worker_thread.start()

       logger.info(" SYSTEM: Worker thread started.")
       time.sleep(1)


       try:
           publish_messages(conn)
           time.sleep(2)
       except KeyboardInterrupt:
           pass
       finally:
           worker.should_stop = True
           logger.info("n SYSTEM: Execution complete.")


if __name__ == "__main__":
   run_example()
SYSTEM: Execution complete.")
if __name__ == "__main__":
run_example()We start the worker in a background thread and fire the producer in the main thread. This structure gives us a mini distributed system running in Colab. By observing the logs, we see messages published → routed → consumed → acknowledged, completing the full event-processing lifecycle.
In conclusion, we orchestrated a dynamic, distributed task-routing pipeline that processes real-time events with clarity and precision. We witnessed how Kombu abstracts away the complexity of messaging systems while still giving us fine-grained control over routing, consumption, and worker concurrency. As we see messages move from producer to exchange to queue to worker, we gained a deeper appreciation for the elegance of event-driven system design, and we are now well-equipped to scale this foundation into robust microservices, background processors, and enterprise-grade workflows.
Check out the . Feel free to check out our . Also, feel free to follow us on and don’t forget to join our and Subscribe to .
The post appeared first on .
 December 19, 2025
Could the AI industry be on the verge of its first major layoffs? Will China spread propaganda to slow the US data-center building boom? Where are AI agents headed?
 December 19, 2025
Google has published T5Gemma 2, a family of open encoder-decoder Transformer checkpoints built by adapting Gemma 3 pretrained weights into an encoder-decoder layout, then continuing pretraining with the UL2 objective. The release is pretrained only, intended for developers to post-train for specific tasks, and Google explicitly notes it is not releasing post-trained or IT checkpoints for this drop.
T5Gemma 2 is positioned as an encoder-decoder counterpart to Gemma 3 that keeps the same low level building blocks, then adds 2 structural changes aimed at small model efficiency. The models inherit Gemma 3 features that matter for deployment, notably multimodality, long context up to 128K tokens, and broad multilingual coverage, with the blog stating over 140 languages.
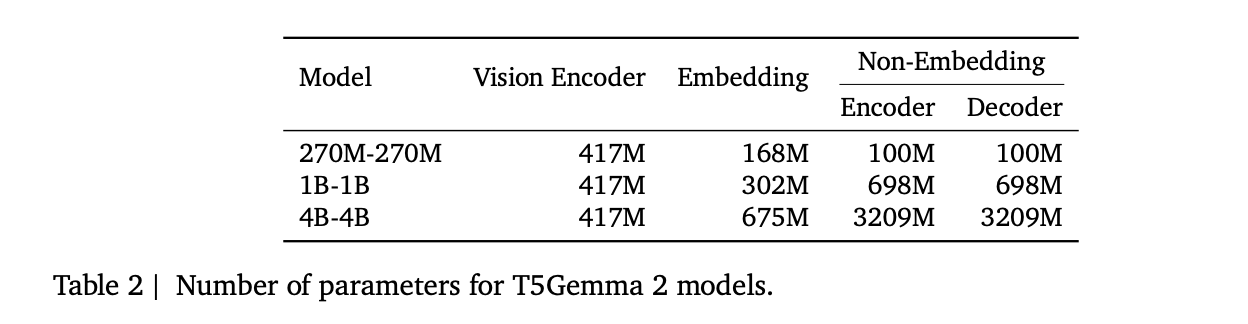
The release includes 3 pretrained sizes, 270M-270M, 1B-1B, and 4B-4B, where the notation means the encoder and decoder are the same size. The research team reports approximate totals excluding the vision encoder, about 370M, 1.7B, and 7B parameters. The multimodal accounting lists a 417M parameter vision encoder, along with encoder and decoder parameters broken into embedding and non embedding components.
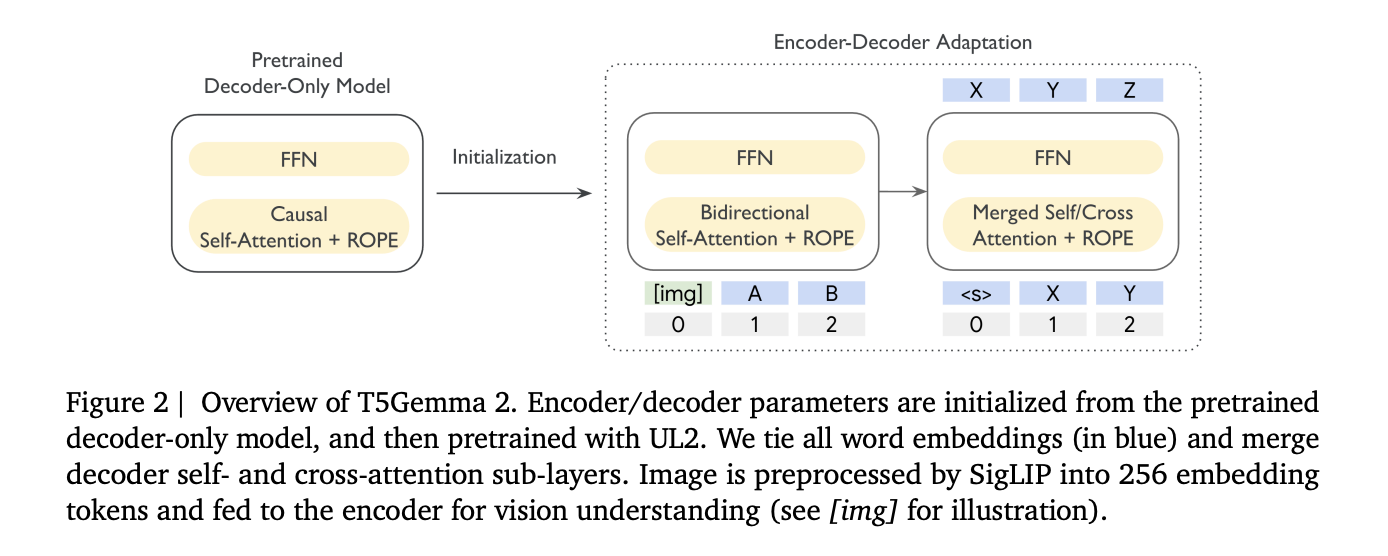
T5Gemma 2 follows the same adaptation idea introduced in T5Gemma, initialize an encoder-decoder model from a decoder-only checkpoint, then adapt with UL2. In the above figure the research team show encoder and decoder parameters initialized from the pretrained decoder-only model, then pretrained with UL2, with images first converted by SigLIP into 256 tokens.
This matters because encoder-decoder splits the workload, the encoder can read the full input bidirectionally, while the decoder focuses on autoregressive generation. The research team argues this separation can help long context tasks where the model must retrieve relevant evidence from a large input before generating.
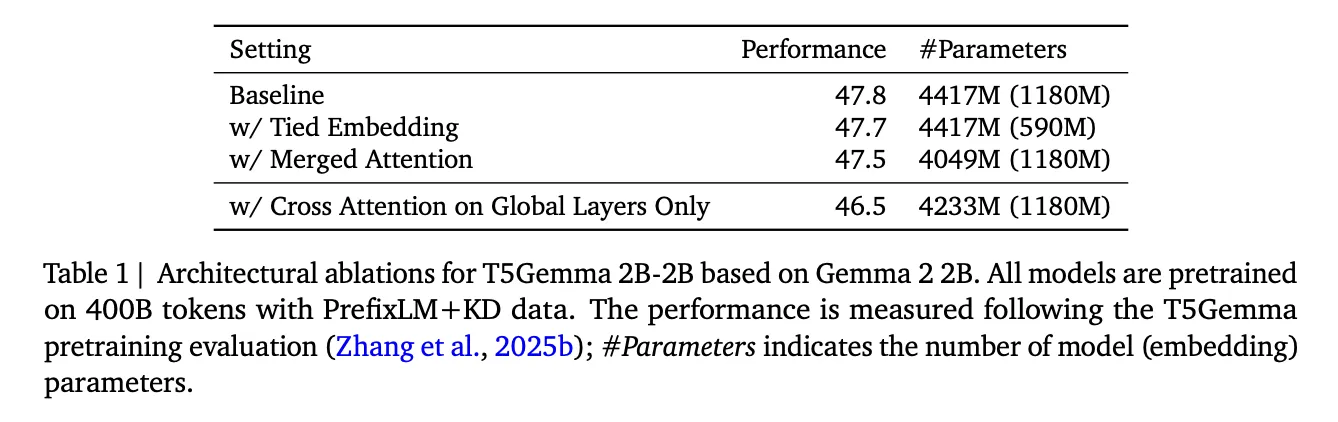
First, T5Gemma 2 uses tied word embeddings across encoder input embedding, decoder input embedding, and decoder output or softmax embedding. This reduces parameter redundancy, and references an ablation showing little quality change while reducing embedding parameters.
Second, it introduces merged attention in the decoder. Instead of separate self-attention and cross-attention sublayers, the decoder performs a single attention operation where K and V are formed by concatenating encoder outputs and decoder states, and masking preserves causal visibility for decoder tokens. This ties to easier initialization, because it narrows differences between the adapted decoder and the original Gemma style decoder stack, and it reports parameter savings with a small average quality drop in their ablations.
T5Gemma 2 is multimodal by reusing Gemma 3’s vision encoder and keeping it frozen during training. Vision tokens are always fed to the encoder and encoder tokens have full visibility to each other in self attention. This is a pragmatic encoder-decoder design, the encoder fuses image tokens with text tokens into contextual representations, and the decoder can then attend to those representations while generating text.
On the tooling side, T5Gemma 2 is placed under an image-text-to-text pipeline, which matches the research’s design, image in, text prompt in, text out. That pipeline example is the fastest way to validate the end to end multimodal path, including dtype choices like bfloat16 and automatic device mapping.
Google researchers attributes the 128K context window to Gemma 3’s alternating local and global attention mechanism. The Gemma 3 team describes a repeating 5 to 1 pattern, 5 local sliding window attention layers followed by 1 global attention layer, with a local window size of 1024. This design reduces KV cache growth relative to making every layer global, which is one reason long context becomes feasible at smaller footprints.
In the T5Gemma 2, the research team also mention adopting positional interpolation methods for long context, and they pretrain on sequences up to 16K input paired with 16K target outputs, then evaluate long context performance up to 128K on benchmarks including RULER and MRCR. The detailed pretraining results table includes 32K and 128K evaluations, showing the long context deltas they claim over Gemma 3 at the same scale.
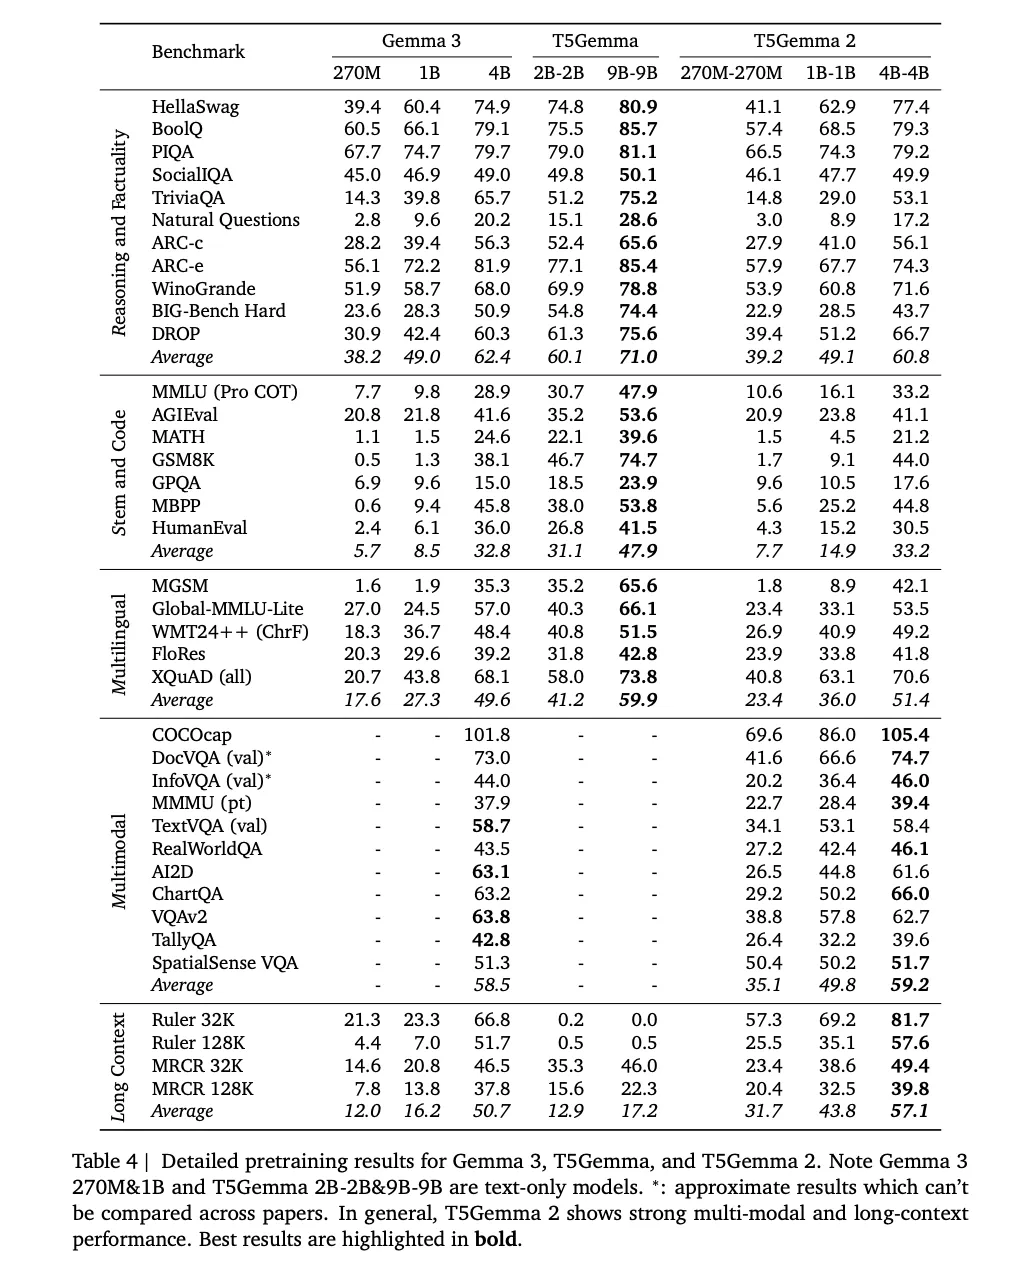
The research team states the models are pretrained on 2T tokens and describes a training setup that includes a batch size of 4.2M tokens, cosine learning rate decay with 100 warmup steps, global gradient clipping at 1.0, and checkpoint averaging over the last 5 checkpoints.
Check out the , and . Also, feel free to follow us on and don’t forget to join our and Subscribe to . Wait! are you on telegram?
The post appeared first on .