Top 12 Robotics AI Blogs/NewsWebsites 2025


Robotics and artificial intelligence are converging at an unprecedented pace, driving breakthroughs in automation, perception, and human-machine collaboration. Staying current with these advancements requires following specialized sources that deliver technical depth, research updates, and industry insights. The following list highlights 12 of the most authoritative robotics and AI-focused blogs and websites to track in 2025.

IEEE Spectrum’s robotics section remains one of the most respected sources for deep technical reporting on autonomy, robot design, locomotion, and control. It combines industry analysis with lab-level insights.

MarkTechPost regularly covers robotics research within the broader AI and machine learning ecosystem. It highlights cutting-edge work in robot learning, perception, simulation, and multi-agent systems.

Robohub is a community-driven platform with contributions from robotics researchers, engineers, and practitioners worldwide. It includes interviews, technical discussions, and updates from research labs.

This news platform blends robotics industry news with technical reporting. It tracks startup activity, industrial automation, and advanced robot designs across sectors.

Academic & Research Lab Blogs

Blogs from labs such as , , and often post about their latest robotics research, datasets, and open-source releases.

Specialist AI-Robotics Hybrids

AI-focused platforms like and frequently publish robotics-related research at the intersection of deep learning, simulation, and embodied AI.

The RIA offers updates on robotics standards, system integration, and industrial automation with strong technical context.

Phys.org aggregates global robotics research news, covering new algorithms, robotic platforms, and mechanical innovations across academia and industry.

ZDNet’s robotics coverage focuses on automation in enterprise settings, offering insight into emerging robotic platforms and their technical deployment.

Singularity Hub explores robotics research along with long-term societal implications. Articles often bridge lab breakthroughs with discussions on AI ethics and human-robot coexistence.

The IEEE RAS blog and conference sites (e.g., IROS, RSS) share technical papers, tutorials, and summaries, making them essential for academic and applied robotics communities.

Practitioners publish robotics-AI tutorials, implementations, and control algorithm discussions here, bridging applied ML with robotics systems.

Conclusion

As robotics continues to evolve across industrial, academic, and consumer domains, these platforms provide essential perspectives on research progress, engineering practices, and real-world deployment. Whether the focus is on control systems, embodied AI, or collaborative robots, these resources remain critical for understanding the trajectory of robotics and its integration with AI in 2025 and beyond.

The post appeared first on .

Read More

How to Build a Robust Advanced Neural AI Agent with Stable Training, Adaptive Learning, and Intelligent Decision-Making?


In this tutorial, we explore the design and implementation of an Advanced Neural Agent that combines classical neural network techniques with modern stability improvements. We build the network using Xavier initialization for balanced gradient flow and add stable activations like leaky ReLU, sigmoid, and tanh with clipping to avoid overflow. To stabilize training, we apply gradient clipping, momentum-inspired updates, and weight decay. The training loop includes mini-batches, early stopping, adaptive learning rates, and resets on instability, making the model robust for complex datasets. We also normalize targets, compute MSE, MAE, and R², and extend the agent with experience replay and exploratory decision-making, turning it into a flexible system for regression, classification-to-regression, and RL-style tasks. Check out the .

import numpy as np
import matplotlib.pyplot as plt
from sklearn.datasets import make_classification, make_regression
from sklearn.preprocessing import StandardScaler
from sklearn.model_selection import train_test_split
import warnings
warnings.filterwarnings('ignore')

We start by importing essential libraries like NumPy, Matplotlib, and scikit-learn, which we use for data generation, preprocessing, and splitting. We also suppress warnings to keep our workflow clean and focused. Check out the .

class AdvancedNeuralAgent:
   def __init__(self, input_size, hidden_layers=[64, 32], output_size=1, learning_rate=0.001):
       """Advanced AI Agent with stable training and decision making capabilities"""
       self.lr = learning_rate
       self.initial_lr = learning_rate
       self.layers = []
       self.memory = []
       self.performance_history = []
       self.epsilon = 1e-8 
      
       layer_sizes = [input_size] + hidden_layers + [output_size]
       for i in range(len(layer_sizes) - 1):
           fan_in, fan_out = layer_sizes[i], layer_sizes[i+1]
           limit = np.sqrt(6.0 / (fan_in + fan_out))
          
           layer = {
               'weights': np.random.uniform(-limit, limit, (layer_sizes[i], layer_sizes[i+1])),
               'bias': np.zeros((1, layer_sizes[i+1])),
               'momentum_w': np.zeros((layer_sizes[i], layer_sizes[i+1])),
               'momentum_b': np.zeros((1, layer_sizes[i+1]))
           }
           self.layers.append(layer)
  
   def activation(self, x, func='relu'):
       """Stable activation functions with clipping"""
       x = np.clip(x, -50, 50) 
      
       if func == 'relu':
           return np.maximum(0, x)
       elif func == 'sigmoid':
           return 1 / (1 + np.exp(-x))
       elif func == 'tanh':
           return np.tanh(x)
       elif func == 'leaky_relu':
           return np.where(x > 0, x, x * 0.01)
       elif func == 'linear':
           return x
  
   def activation_derivative(self, x, func='relu'):
       """Stable derivatives"""
       x = np.clip(x, -50, 50)
      
       if func == 'relu':
           return (x > 0).astype(float)
       elif func == 'sigmoid':
           s = self.activation(x, 'sigmoid')
           return s * (1 - s)
       elif func == 'tanh':
           return 1 - np.tanh(x)**2
       elif func == 'leaky_relu':
           return np.where(x > 0, 1, 0.01)
       elif func == 'linear':
           return np.ones_like(x)
  
   def forward(self, X):
       """Forward pass with gradient clipping"""
       self.activations = [X]
       self.z_values = []
      
       current_input = X
       for i, layer in enumerate(self.layers):
           z = np.dot(current_input, layer['weights']) + layer['bias']
           z = np.clip(z, -50, 50) 
           self.z_values.append(z)
          
           if i < len(self.layers) - 1: 
               a = self.activation(z, 'leaky_relu')
           else: 
               a = self.activation(z, 'linear')
          
           self.activations.append(a)
           current_input = a
      
       return current_input
  
   def clip_gradients(self, gradients, max_norm=1.0):
       """Gradient clipping to prevent explosion"""
       grad_norm = np.linalg.norm(gradients)
       if grad_norm > max_norm:
           gradients = gradients * (max_norm / (grad_norm + self.epsilon))
       return gradients
  
   def backward(self, X, y, output):
       """Stable backpropagation with gradient clipping"""
       m = X.shape[0]
      
       dz = (output - y.reshape(-1, 1)) / m
       dz = np.clip(dz, -10, 10)
      
       for i in reversed(range(len(self.layers))):
           layer = self.layers[i]
          
           dw = np.dot(self.activations[i].T, dz)
           db = np.sum(dz, axis=0, keepdims=True)
          
           dw = self.clip_gradients(dw, max_norm=1.0)
           db = self.clip_gradients(db, max_norm=1.0)
          
           momentum = 0.9
           layer['momentum_w'] = momentum * layer['momentum_w'] + (1 - momentum) * dw
           layer['momentum_b'] = momentum * layer['momentum_b'] + (1 - momentum) * db
          
           weight_decay = 0.0001
           layer['weights'] -= self.lr * (layer['momentum_w'] + weight_decay * layer['weights'])
           layer['bias'] -= self.lr * layer['momentum_b']
          
           if i > 0:
               activation_func = 'leaky_relu' if i > 1 else 'leaky_relu'
               dz = np.dot(dz, layer['weights'].T) * self.activation_derivative(
                   self.z_values[i-1], activation_func)
               dz = np.clip(dz, -10, 10) 
  
   def adapt_learning_rate(self, epoch, performance_history):
       """Adaptive learning rate with performance-based adjustment"""
       if epoch > 10:
           recent_performance = performance_history[-10:]
           if len(recent_performance) >= 5:
               if recent_performance[-1] >= recent_performance[-5]:
                   self.lr = max(self.lr * 0.95, self.initial_lr * 0.01)
               elif recent_performance[-1] < recent_performance[-5] * 0.98:
                   self.lr = min(self.lr * 1.02, self.initial_lr * 2)
  
   def calculate_loss(self, y_true, y_pred):
       """Stable loss calculation"""
       y_true = y_true.reshape(-1, 1)
       y_pred = np.clip(y_pred, -1e6, 1e6) 
      
       mse = np.mean((y_true - y_pred) ** 2)
       mae = np.mean(np.abs(y_true - y_pred))
      
       if not np.isfinite(mse):
           mse = 1e6
       if not np.isfinite(mae):
           mae = 1e6
          
       return mse, mae
  
   def store_experience(self, state, action, reward, next_state):
       """Experience replay for RL aspects"""
       experience = {
           'state': state,
           'action': action,
           'reward': reward,
           'next_state': next_state,
           'timestamp': len(self.memory)
       }
       self.memory.append(experience)
      
       if len(self.memory) > 1000:
           self.memory.pop(0)
  
   def make_decision(self, X, exploration_rate=0.1):
       """Stable decision making"""
       prediction = self.forward(X)
      
       if np.random.random() < exploration_rate:
           noise_scale = np.std(prediction) * 0.1 if np.std(prediction) > 0 else 0.1
           noise = np.random.normal(0, noise_scale, prediction.shape)
           prediction += noise
      
       return np.clip(prediction, -1e6, 1e6)
  
   def reset_if_unstable(self):
       """Reset network if training becomes unstable"""
       print("🔄 Resetting network due to instability...")
       for i, layer in enumerate(self.layers):
           fan_in, fan_out = layer['weights'].shape
           limit = np.sqrt(6.0 / (fan_in + fan_out))
           layer['weights'] = np.random.uniform(-limit, limit, (fan_in, fan_out))
           layer['bias'] = np.zeros((1, fan_out))
           layer['momentum_w'] = np.zeros((fan_in, fan_out))
           layer['momentum_b'] = np.zeros((1, fan_out))
       self.lr = self.initial_lr
  
   def train(self, X, y, epochs=500, batch_size=32, validation_split=0.2, verbose=True):
       """Robust training with stability checks"""
       y_mean, y_std = np.mean(y), np.std(y)
       y_normalized = (y - y_mean) / (y_std + self.epsilon)
      
       X_trn, X_val, y_trn, y_val = train_test_split(
           X, y_normalized, test_size=validation_split, random_state=42)
      
       best_val_loss = float('inf')
       patience = 30
       patience_counter = 0
      
       train_losses, val_losses = [], []
       reset_count = 0
      
       for epoch in range(epochs):
           if epoch > 0 and (not np.isfinite(train_losses[-1]) or train_losses[-1] > 1e6):
               if reset_count < 2: 
                   self.reset_if_unstable()
                   reset_count += 1
                   continue
               else:
                   print("🚫 Training unstable, stopping...")
                   break
          
           indices = np.random.permutation(len(X_train))
           X_train_shuffled = X_train[indices]
           y_train_shuffled = y_train[indices]
          
           epoch_loss = 0
           batches = 0
           for i in range(0, len(X_trn), batch_size):
               batch_X = X_train_shuffled[i:i+batch_size]
               batch_y = y_train_shuffled[i:i+batch_size]
              
               if len(batch_X) == 0:
                   continue
              
               output = self.forward(batch_X)
               self.backward(batch_X, batch_y, output)
              
               loss, _ = self.calculate_loss(batch_y, output)
               epoch_loss += loss
               batches += 1
          
           avg_train_loss = epoch_loss / max(batches, 1)
          
           val_output = self.forward(X_val)
           val_loss, val_mae = self.calculate_loss(y_val, val_output)
          
           train_losses.append(avg_train_loss)
           val_losses.append(val_loss)
           self.performance_history.append(val_loss)
          
           if val_loss < best_val_loss:
               best_val_loss = val_loss
               patience_counter = 0
           else:
               patience_counter += 1
          
           if patience_counter >= patience:
               if verbose:
                   print(f"✋ Early stopping at epoch {epoch}")
               break
          
           if epoch > 0:
               self.adapt_learning_rate(epoch, self.performance_history)
          
           if verbose and (epoch % 50 == 0 or epoch < 10):
               print(f"Epoch {epoch:3d}: Train Loss = {avg_train_loss:.4f}, "
                     f"Val Loss = {val_loss:.4f}, LR = {self.lr:.6f}")
      
       self.y_mean, self.y_std = y_mean, y_std
       return train_losses, val_losses
  
   def predict(self, X):
       """Make predictions with denormalization"""
       normalized_pred = self.forward(X)
       if hasattr(self, 'y_mean') and hasattr(self, 'y_std'):
           return normalized_pred * self.y_std + self.y_mean
       return normalized_pred
  
   def evaluate_performance(self, X, y):
       """Comprehensive performance evaluation"""
       predictions = self.predict(X)
       mse, mae = self.calculate_loss(y, predictions)
      
       y_mean = np.mean(y)
       ss_tot = np.sum((y - y_mean) ** 2)
       ss_res = np.sum((y.reshape(-1, 1) - predictions) ** 2)
       r2 = 1 - (ss_res / (ss_tot + self.epsilon))
      
       return {
           'mse': float(mse) if np.isfinite(mse) else float('inf'),
           'mae': float(mae) if np.isfinite(mae) else float('inf'),
           'r2': float(r2) if np.isfinite(r2) else -float('inf'),
           'predictions': predictions.flatten()
       }
  
   def visualize_training(self, train_losses, val_losses):
       """Visualize training progress"""
       plt.figure(figsize=(15, 5))
      
       plt.subplot(1, 3, 1)
       plt.plot(train_losses, label='Training Loss', alpha=0.8)
       plt.plot(val_losses, label='Validation Loss', alpha=0.8)
       plt.title('Training Progress')
       plt.xlabel('Epoch')
       plt.ylabel('Loss')
       plt.legend()
       plt.grid(True, alpha=0.3)
       plt.yscale('log')
      
       plt.subplot(1, 3, 2)
       if len(self.performance_history) > 0:
           plt.plot(self.performance_history)
           plt.title('Performance History')
           plt.xlabel('Epoch')
           plt.ylabel('Validation Loss')
           plt.grid(True, alpha=0.3)
           plt.yscale('log')
      
       plt.subplot(1, 3, 3)
       if hasattr(self, 'lr_history'):
           plt.plot(self.lr_history)
           plt.title('Learning Rate Schedule')
           plt.xlabel('Epoch')
           plt.ylabel('Learning Rate')
           plt.grid(True, alpha=0.3)
      
       plt.tight_layout()
       plt.show()

We implement an AdvancedNeuralAgent that we initialize with Xavier limits, leaky-ReLU activations, and momentum buffers to stabilize gradients and speed convergence. We train with mini-batches, gradient clipping, L2 weight decay, adaptive learning rates, early stopping, and automatic resets, and we track MSE/MAE/R² with normalization for reliable metrics. We also add experience replay and exploratory decisions for agent-like behavior, and we expose plotting utilities to visualize losses, validation history, and the LR schedule. Check out the .

class AIAgentDemo:
   """Demo class for testing the AI Agent with various scenarios"""
  
   def __init__(self):
       self.agents = {}
       self.results = {}
  
   def generate_datasets(self):
       """Generate multiple test datasets"""
       datasets = {}
      
       X1, y1 = make_regression(n_samples=600, n_features=5, n_informative=4,
                               noise=0.1, random_state=42)
       datasets['simple'] = (X1, y1, "Simple Regression")
      
       X2, y2 = make_regression(n_samples=800, n_features=10, n_informative=8,
                               noise=0.2, random_state=123)
       datasets['complex'] = (X2, y2, "Complex Regression")
      
       X3, y3 = make_classification(n_samples=700, n_features=8, n_informative=6,
                                  n_classes=2, random_state=456)
       y3 = y3.astype(float) + np.random.normal(0, 0.1, len(y3))
       datasets['classification'] = (X3, y3, "Classification-to-Regression")
      
       return datasets
  
   def test_agent_configuration(self, config_name, X, y, **agent_params):
       """Test agent with specific configuration"""
       print(f"n🧪 Testing {config_name}...")
      
       scaler = StandardScaler()
       X_scaled = scaler.fit_transform(X)
      
       default_params = {
           'input_size': X_scaled.shape[1],
           'hidden_layers': [32, 16],
           'output_size': 1,
           'learning_rate': 0.005
       }
       default_params.update(agent_params)
      
       agent = AdvancedNeuralAgent(**default_params)
      
       try:
           train_losses, val_losses = agent.train(
               X_scaled, y, epochs=150, batch_size=32, verbose=False)
          
           X_trn, X_test, y_trn, y_test = train_test_split(
               X_scaled, y, test_size=0.2, random_state=42)
          
           performance = agent.evaluate_performance(X_test, y_test)
          
           self.agents[config_name] = agent
           self.results[config_name] = {
               'performance': performance,
               'train_losses': train_losses,
               'val_losses': val_losses,
               'data_shape': X_scaled.shape
           }
          
           print(f"✅ {config_name}: R²={performance['r2']:.3f}, MSE={performance['mse']:.3f}")
           return True
          
       except Exception as e:
           print(f"❌ {config_name} failed: {str(e)[:50]}...")
           return False
  
   def run_comprehensive_demo(self):
       """Run comprehensive testing of the AI agent"""
       print("🤖 COMPREHENSIVE AI AGENT DEMO")
       print("=" * 60)
      
       datasets = self.generate_datasets()
      
       configs = {
           'lightweight': {'hidden_layers': [16, 8], 'learning_rate': 0.01},
           'standard': {'hidden_layers': [32, 16], 'learning_rate': 0.005},
           'deep': {'hidden_layers': [64, 32, 16], 'learning_rate': 0.003},
           'wide': {'hidden_layers': [128, 64], 'learning_rate': 0.002}
       }
      
       success_count = 0
       total_tests = len(datasets) * len(configs)
      
       for dataset_name, (X, y, desc) in datasets.items():
           print(f"n📊 Dataset: {desc} - Shape: {X.shape}")
           print(f"Target range: [{np.min(y):.2f}, {np.max(y):.2f}]")
          
           for config_name, config_params in configs.items():
               test_name = f"{dataset_name}_{config_name}"
               if self.test_agent_configuration(test_name, X, y, **config_params):
                   success_count += 1
      
       print(f"n📈 OVERALL RESULTS: {success_count}/{total_tests} tests successful")
      
       if self.results:
           self.show_best_performers()
           self.demonstrate_agent_intelligence()
  
   def show_best_performers(self):
       """Show top performing configurations"""
       print(f"n🏆 TOP PERFORMERS:")
      
       sorted_results = sorted(self.results.items(),
                             key=lambda x: x[1]['performance']['r2'],
                             reverse=True)
      
       for i, (name, result) in enumerate(sorted_results[:5]):
           perf = result['performance']
           print(f"{i+1}. {name}: R²={perf['r2']:.3f}, MSE={perf['mse']:.3f}, MAE={perf['mae']:.3f}")
  
   def demonstrate_agent_intelligence(self):
       """Demonstrate advanced AI capabilities"""
       if not self.agents:
           return
          
       print(f"n🧠 INTELLIGENCE DEMONSTRATION:")
      
       best_name = max(self.results.keys(),
                      key=lambda x: self.results[x]['performance']['r2'])
       best_agent = self.agents[best_name]
      
       print(f"Using best agent: {best_name}")
      
       print(f"💾 Memory capacity: {len(best_agent.memory)} experiences")
      
       dummy_input = np.random.randn(3, best_agent.layers[0]['weights'].shape[0])
       conservative_decisions = best_agent.make_decision(dummy_input, exploration_rate=0.0)
       exploratory_decisions = best_agent.make_decision(dummy_input, exploration_rate=0.3)
      
       print(f"🎯 Decision making:")
       print(f"   Conservative: {conservative_decisions.flatten()[:3]}")
       print(f"   Exploratory:  {exploratory_decisions.flatten()[:3]}")
      
       if len(best_agent.performance_history) > 10:
           initial_perf = np.mean(best_agent.performance_history[:5])
           final_perf = np.mean(best_agent.performance_history[-5:])
           improvement = ((initial_perf - final_perf) / initial_perf) * 100
           print(f"📊 Learning improvement: {improvement:.1f}%")
      
       total_params = sum(layer['weights'].size + layer['bias'].size
                         for layer in best_agent.layers)
       print(f"🔧 Network complexity: {total_params} parameters")
      
       return best_agent

We orchestrate a comprehensive demo where we generate multiple datasets, sweep agent configurations, and train/evaluate each setup with standardized metrics (R², MSE, MAE). We log results, rank top performers, and then showcase “intelligence” by probing memory, exploration vs. exploitation decisions, learning improvement, and total parameter count. Check out the .

def run_quick_demo():
   """Quick demo for immediate testing"""
   print("🚀 QUICK AI AGENT DEMO")
   print("=" * 40)
  
   X, y = make_regression(n_samples=500, n_features=6, noise=0.15, random_state=42)
   scaler = StandardScaler()
   X_scaled = scaler.fit_transform(X)
  
   print(f"Dataset: {X_scaled.shape[0]} samples, {X_scaled.shape[1]} features")
  
   agent = AdvancedNeuralAgent(
       input_size=X_scaled.shape[1],
       hidden_layers=[24, 12],
       output_size=1,
       learning_rate=0.008
   )
  
   print("Training agent...")
   train_losses, val_losses = agent.train(X_scaled, y, epochs=100, verbose=False)
  
   X_trn, X_test, y_trn, y_test = train_test_split(X_scaled, y, test_size=0.2, random_state=42)
   performance = agent.evaluate_performance(X_test, y_test)
  
   print(f"n✅ RESULTS:")
   print(f"R² Score: {performance['r2']:.3f}")
   print(f"MSE: {performance['mse']:.3f}")
   print(f"MAE: {performance['mae']:.3f}")
  
   agent.visualize_training(train_losses, val_losses)
  
   return agent

We add a quick demo utility that trains the agent on a simple regression dataset with six features, using a lightweight two-layer configuration. We normalize the data, train for 100 epochs, evaluate on a test split, and display R², MSE, and MAE before plotting training vs. validation loss curves for immediate feedback. Check out the .

if __name__ == "__main__":
   print("Choose demo type:")
   print("1. Quick Demo (fast)")
   print("2. Comprehensive Demo (detailed)")
  
   demo = AIAgentDemo()
   best_agent = demo.run_comprehensive_demo()

We define the main entry point so the script can be run directly. We display demo options, initialize AIAgentDemo, and by default execute the comprehensive demo, which trains multiple configurations across datasets, evaluates performance, and highlights the best agent.

In conclusion, we demonstrate how stability-aware engineering choices, ranging from weight decay regularization to dynamic learning rate scaling based on validation loss history, play a critical role in achieving consistent performance across diverse datasets. The agent is not just a static predictor; it actively adapts by storing past experiences, injecting controlled exploration into its decisions, and resetting its parameters when instability thresholds are reached. We further validate the design through comprehensive demos across lightweight, standard, deep, and wide configurations, benchmarking performance on simple, complex, and classification-derived regression datasets. The results highlight measurable improvements in R², MSE, and MAE, while visualization tools provide insight into learning dynamics and convergence behavior.


Check out the . Feel free to check out our . Also, feel free to follow us on  and don’t forget to join our  and Subscribe to .

The post appeared first on .

Read More
Google AI Releases VaultGemma: The Largest and Most Capable Open Model (1B-parameters) Trained from Scratch with Differential Privacy

Google AI Releases VaultGemma: The Largest and Most Capable Open Model (1B-parameters) Trained from Scratch with Differential Privacy


Google AI Research and DeepMind have released VaultGemma 1B, the largest open-weight large language model trained entirely with differential privacy (DP). This development is a major step toward building AI models that are both powerful and privacy-preserving.

Why Do We Need Differential Privacy in LLMs?

Large language models trained on vast web-scale datasets are prone to memorization attacks, where sensitive or personally identifiable information can be extracted from the model. Studies have shown that verbatim training data can resurface, especially in open-weight releases.

Differential Privacy offers a mathematical guarantee that prevents any single training example from significantly influencing the model. Unlike approaches that apply DP only during fine-tuning, VaultGemma enforces full private pretraining, ensuring that privacy protection begins at the foundational level.

https://services.google.com/fh/files/blogs/vaultgemma_tech_report.pdf

What Is the Architecture of VaultGemma?

VaultGemma is architecturally similar to earlier Gemma models, but optimized for private training.

  • Model size: 1B parameters, 26 layers.
  • Transformer type: Decoder-only.
  • Activations: GeGLU with feedforward dimension of 13,824.
  • Attention: Multi-Query Attention (MQA) with global span of 1024 tokens.
  • Normalization: RMSNorm in pre-norm configuration.
  • Tokenizer: SentencePiece with a 256K vocabulary.

A notable change is the reduction of sequence length to 1024 tokens, which lowers compute costs and enables larger batch sizes under DP constraints.

What Data Was Used for Training?

VaultGemma was trained on the same 13 trillion-token dataset as Gemma 2, composed primarily of English text from web documents, code, and scientific articles.

The dataset underwent several filtering stages to:

  • Remove unsafe or sensitive content.
  • Reduce personal information exposure.
  • Prevent evaluation data contamination.

This ensures both safety and fairness in benchmarking.

How Was Differential Privacy Applied?

VaultGemma used DP-SGD (Differentially Private Stochastic Gradient Descent) with gradient clipping and Gaussian noise addition. Implementation was built on JAX Privacy and introduced optimizations for scalability:

  • Vectorized per-example clipping for parallel efficiency.
  • Gradient accumulation to simulate large batches.
  • Truncated Poisson Subsampling integrated into the data loader for efficient on-the-fly sampling.

The model achieved a formal DP guarantee of (ε ≤ 2.0, δ ≤ 1.1e−10) at the sequence level (1024 tokens).

How Do Scaling Laws Work for Private Training?

Training large models under DP constraints requires new scaling strategies. The VaultGemma team developed DP-specific scaling laws with three innovations:

  1. Optimal learning rate modeling using quadratic fits across training runs.
  2. Parametric extrapolation of loss values to reduce reliance on intermediate checkpoints.
  3. Semi-parametric fits to generalize across model size, training steps, and noise-batch ratios.

This methodology enabled precise prediction of achievable loss and efficient resource use on the TPUv6e training cluster.

What Were the Training Configurations?

VaultGemma was trained on 2048 TPUv6e chips using GSPMD partitioning and MegaScale XLA compilation.

  • Batch size: ~518K tokens.
  • Training iterations: 100,000.
  • Noise multiplier: 0.614.

The achieved loss was within 1% of predictions from the DP scaling law, validating the approach.

How Does VaultGemma Perform Compared to Non-Private Models?

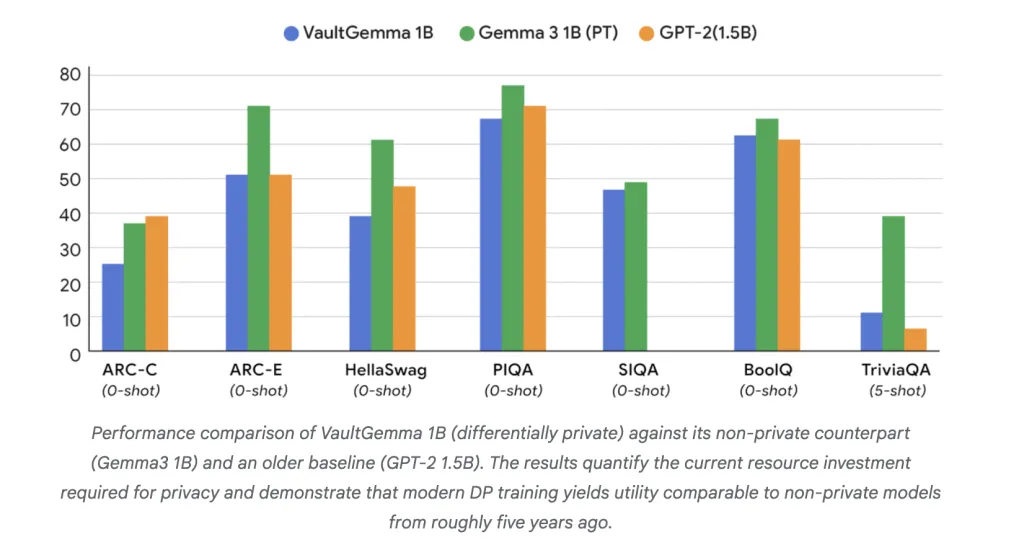
On academic benchmarks, VaultGemma trails its non-private counterparts but shows strong utility:

  • ARC-C: 26.45 vs. 38.31 (Gemma-3 1B).
  • PIQA: 68.0 vs. 70.51 (GPT-2 1.5B).
  • TriviaQA (5-shot): 11.24 vs. 39.75 (Gemma-3 1B).

These results suggest that DP-trained models are currently comparable to non-private models from about five years ago. Importantly, memorization tests confirmed that no training data leakage was detectable in VaultGemma, unlike in non-private Gemma models.

https://services.google.com/fh/files/blogs/vaultgemma_tech_report.pdf

Summary

In summary, VaultGemma 1B proves that large-scale language models can be trained with rigorous differential privacy guarantees without making them impractical to use. While a utility gap remains compared to non-private counterparts, the release of both the model and its training methodology provides the community with a strong foundation for advancing private AI. This work signals a shift toward building models that are not only capable but also inherently safe, transparent, and privacy-preserving.


Check out the  and . Feel free to check out our . Also, feel free to follow us on  and don’t forget to join our  and Subscribe to .

The post appeared first on .

Read More
IBM AI Research Releases Two English Granite Embedding Models, Both Based on the ModernBERT Architecture

IBM AI Research Releases Two English Granite Embedding Models, Both Based on the ModernBERT Architecture


IBM has quietly built a strong presence in the open-source AI ecosystem, and its latest release shows why it shouldn’t be overlooked. The company has introduced two new embedding models—granite-embedding-english-r2 and granite-embedding-small-english-r2—designed specifically for high-performance retrieval and RAG (retrieval-augmented generation) systems. These models are not only compact and efficient but also licensed under Apache 2.0, making them ready for commercial deployment.

What Models Did IBM Release?

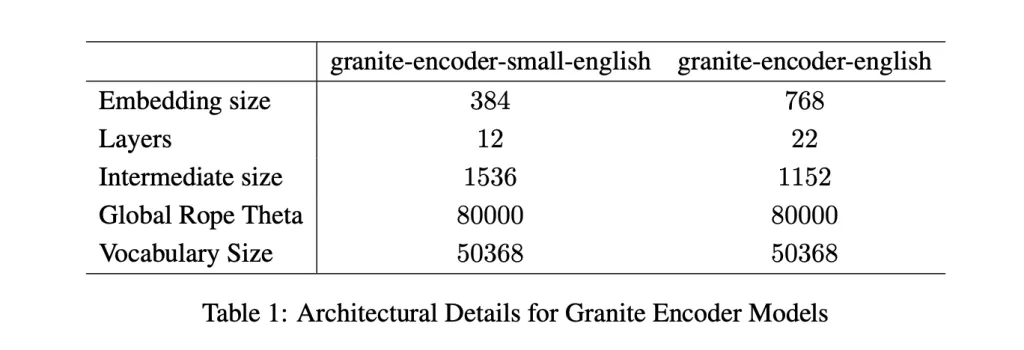
The two models target different compute budgets. The larger granite-embedding-english-r2 has 149 million parameters with an embedding size of 768, built on a 22-layer ModernBERT encoder. Its smaller counterpart, granite-embedding-small-english-r2, comes in at just 47 million parameters with an embedding size of 384, using a 12-layer ModernBERT encoder.

Despite their differences in size, both support a maximum context length of 8192 tokens, a major upgrade from the first-generation Granite embeddings. This long-context capability makes them highly suitable for enterprise workloads involving long documents and complex retrieval tasks.

https://arxiv.org/abs/2508.21085

What’s Inside the Architecture?

Both models are built on the ModernBERT backbone, which introduces several optimizations:

  • Alternating global and local attention to balance efficiency with long-range dependencies.
  • Rotary positional embeddings (RoPE) tuned for positional interpolation, enabling longer context windows.
  • FlashAttention 2 to improve memory usage and throughput at inference time.

IBM also trained these models with a multi-stage pipeline. The process started with masked language pretraining on a two-trillion-token dataset sourced from web, Wikipedia, PubMed, BookCorpus, and internal IBM technical documents. This was followed by context extension from 1k to 8k tokens, contrastive learning with distillation from Mistral-7B, and domain-specific tuning for conversational, tabular, and code retrieval tasks.

How Do They Perform on Benchmarks?

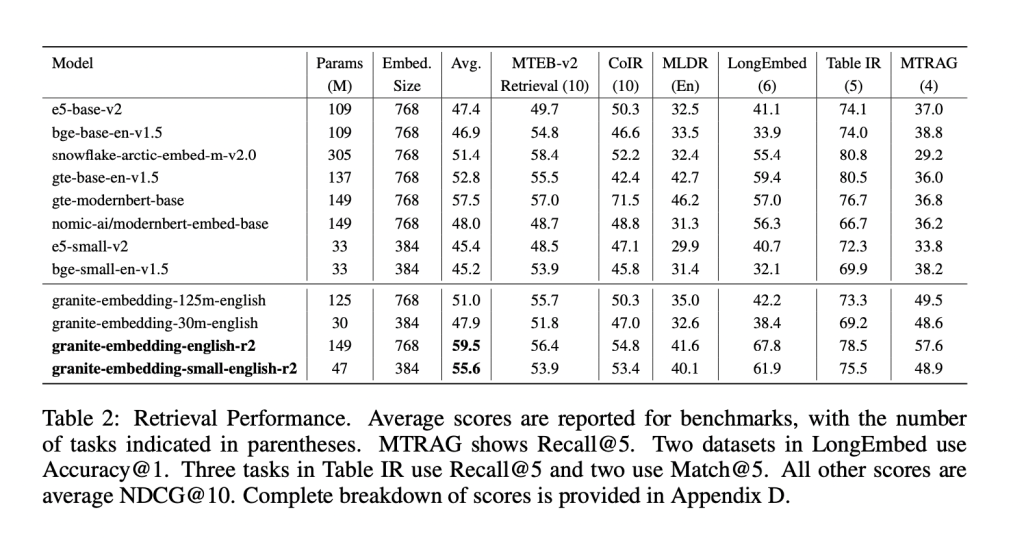
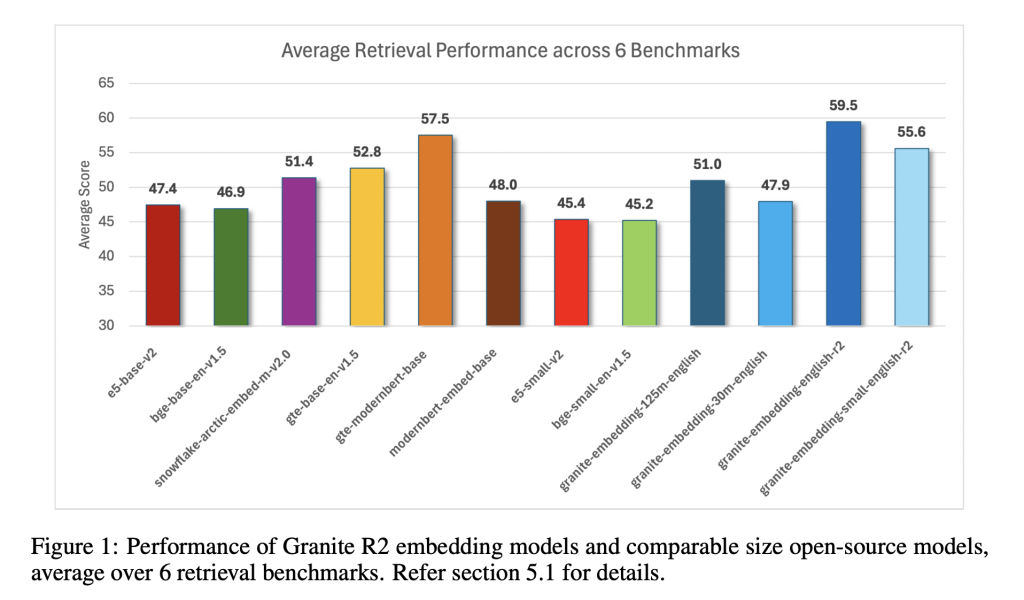
The Granite R2 models deliver strong results across widely used retrieval benchmarks. On MTEB-v2 and BEIR, the larger granite-embedding-english-r2 outperforms similarly sized models like BGE Base, E5, and Arctic Embed. The smaller model, granite-embedding-small-english-r2, achieves accuracy close to models two to three times larger, making it particularly attractive for latency-sensitive workloads.

https://arxiv.org/abs/2508.21085

Both models also perform well in specialized domains:

  • Long-document retrieval (MLDR, LongEmbed) where 8k context support is critical.
  • Table retrieval tasks (OTT-QA, FinQA, OpenWikiTables) where structured reasoning is required.
  • Code retrieval (CoIR), handling both text-to-code and code-to-text queries.

Are They Fast Enough for Large-Scale Use?

Efficiency is one of the standout aspects of these models. On an Nvidia H100 GPU, the granite-embedding-small-english-r2 encodes nearly 200 documents per second, which is significantly faster than BGE Small and E5 Small. The larger granite-embedding-english-r2 also reaches 144 documents per second, outperforming many ModernBERT-based alternatives.

Crucially, these models remain practical even on CPUs, allowing enterprises to run them in less GPU-intensive environments. This balance of speed, compact size, and retrieval accuracy makes them highly adaptable for real-world deployment.

What Does This Mean for Retrieval in Practice?

IBM’s Granite Embedding R2 models demonstrate that embedding systems don’t need massive parameter counts to be effective. They combine long-context support, benchmark-leading accuracy, and high throughput in compact architectures. For companies building retrieval pipelines, knowledge management systems, or RAG workflows, Granite R2 provides a production-ready, commercially viable alternative to existing open-source options.

https://arxiv.org/abs/2508.21085

Summary

In short, IBM’s Granite Embedding R2 models strike an effective balance between compact design, long-context capability, and strong retrieval performance. With throughput optimized for both GPU and CPU environments, and an Apache 2.0 license that enables unrestricted commercial use, they present a practical alternative to bulkier open-source embeddings. For enterprises deploying RAG, search, or large-scale knowledge systems, Granite R2 stands out as an efficient and production-ready option.


Check out the , and . Feel free to check out our . Also, feel free to follow us on  and don’t forget to join our  and Subscribe to .

The post appeared first on .

Read More
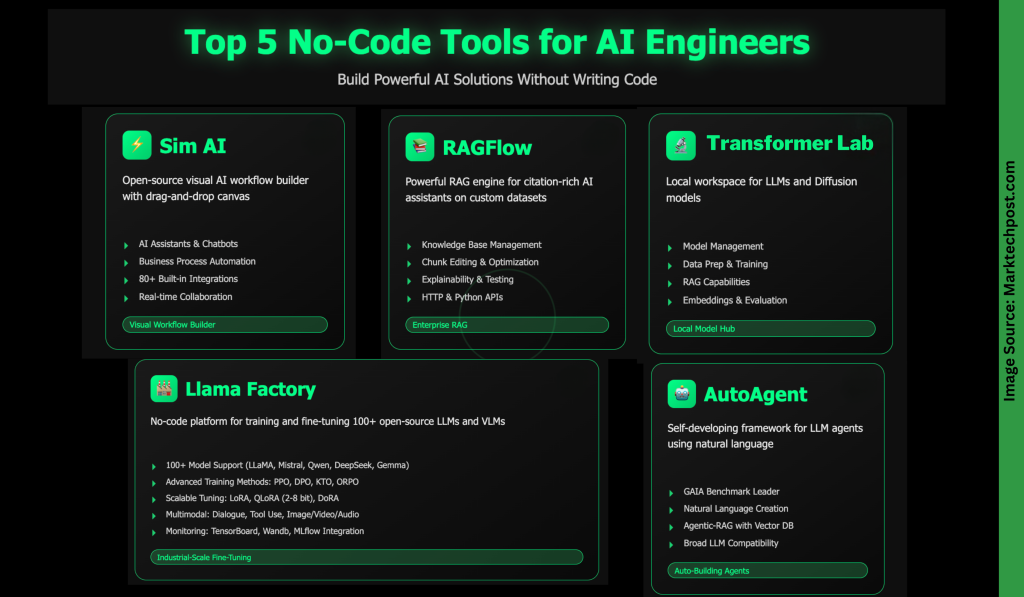
Top 5 No-Code Tools for AI Engineers/Developers

Top 5 No-Code Tools for AI Engineers/Developers


In today’s AI-driven world, no-code tools are transforming how people create and deploy intelligent applications. They empower anyone—regardless of coding expertise—to build solutions quickly and efficiently. From developing enterprise-grade RAG systems to designing multi-agent workflows or fine-tuning hundreds of LLMs, these platforms dramatically reduce development time and effort. In this article, we’ll explore five powerful no-code tools that make building AI solutions faster and more accessible than ever.

Sim AI is an open-source platform for visually building and deploying AI agent workflows—no coding required. Using its drag-and-drop canvas, you can connect AI models, APIs, databases, and business tools to create:

  • AI Assistants & Chatbots: Agents that search the web, access calendars, send emails, and interact with business apps.
  • Business Process Automation: Streamline tasks such as data entry, report creation, customer support, and content generation.
  • Data Processing & Analysis: Extract insights, analyze datasets, create reports, and sync data across systems.
  • API Integration Workflows: Orchestrate complex logic, unify services, and manage event-driven automation.

Key features:

  • Visual canvas with “smart blocks” (AI, API, logic, output).
  • Multiple triggers (chat, REST API, webhooks, schedulers, Slack/GitHub events).
  • Real-time team collaboration with permissions control.
  • 80+ built-in integrations (AI models, communication tools, productivity apps, dev platforms, search services, and databases).
  • MCP support for custom integrations.

Deployment options:

  • Cloud-hosted (managed infrastructure with scaling & monitoring).
  • Self-hosted (via Docker, with local model support for data privacy).

RAGFlow is a powerful retrieval-augmented generation (RAG) engine that helps you build grounded, citation-rich AI assistants on top of your own datasets. It runs on x86 CPUs or NVIDIA GPUs (with optional ARM builds) and provides full or slim Docker images for quick deployment. After spinning up a local server, you can connect an LLM—via API or local runtimes like Ollama—to handle chat, embedding, or image-to-text tasks. RAGFlow supports most popular language models and allows you to set defaults or customize models for each assistant.

Key capabilities include:

  • Knowledge base management: Upload and parse files (PDF, Word, CSV, images, slides, and more) into datasets, select an embedding model, and organize content for efficient retrieval.
  • Chunk editing & optimization: Inspect parsed chunks, add keywords, or manually adjust content to improve search accuracy.
  • AI chat assistants: Create chats linked to one or multiple knowledge bases, configure fallback responses, and fine-tune prompts or model settings.
  • Explainability & testing: Use built-in tools to validate retrieval quality, monitor performance, and view real-time citations.
  • Integration & extensibility: Leverage HTTP and Python APIs for app integration, with an optional sandbox for safe code execution inside chats.

Transformer Lab is a free, open-source workspace for Large Language Models (LLMs) and Diffusion models, designed to run on your local machine—whether that’s a GPU, TPU, or Apple M-series Mac—or in the cloud. It enables you to download, chat with, and evaluate LLMs, generate images using Diffusion models, and compute embeddings, all from one flexible environment.

Key capabilities include:

  • Model management: Download and interact with LLMs, or generate images using state-of-the-art Diffusion models.
  • Data preparation & training: Create datasets, fine-tune, or train models, including support for RLHF and preference tuning.
  • Retrieval-augmented generation (RAG): Use your own documents to power intelligent, grounded conversations.
  • Embeddings & evaluation: Calculate embeddings and assess model performance across different inference engines.
  • Extensibility & community: Build plugins, contribute to the core application, and collaborate via the active Discord community.

LLaMA-Factory is a powerful no-code platform for training and fine-tuning open-source Large Language Models (LLMs) and Vision-Language Models (VLMs). It supports over 100 models, multimodal fine-tuning, advanced optimization algorithms, and scalable resource configurations. Designed for researchers and practitioners, it offers extensive tools for pre-training, supervised fine-tuning, reward modeling, and reinforcement learning methods like PPO and DPO—along with easy experiment tracking and faster inference.

Key highlights include:

  • Broad model support: Works with LLaMA, Mistral, Qwen, DeepSeek, Gemma, ChatGLM, Phi, Yi, Mixtral-MoE, and many more.
  • Training methods: Supports continuous pre-training, multimodal SFT, reward modeling, PPO, DPO, KTO, ORPO, and more.
  • Scalable tuning options: Full-tuning, freeze-tuning, LoRA, QLoRA (2–8 bit), OFT, DoRA, and other resource-efficient techniques.
  • Advanced algorithms & optimizations: Includes GaLore, BAdam, APOLLO, Muon, FlashAttention-2, RoPE scaling, NEFTune, rsLoRA, and others.
  • Tasks & modalities: Handles dialogue, tool use, image/video/audio understanding, visual grounding, and more.
  • Monitoring & inference: Integrates with LlamaBoard, TensorBoard, Wandb, MLflow, and SwanLab, plus offers fast inference via OpenAI-style APIs, Gradio UI, or CLI with vLLM/SGLang workers.
  • Flexible infrastructure: Compatible with PyTorch, Hugging Face Transformers, Deepspeed, BitsAndBytes, and supports both CPU/GPU setups with memory-efficient quantization.

AutoAgent is a fully automated, self-developing framework that lets you create and deploy LLM-powered agents using natural language alone. Designed to simplify complex workflows, it enables you to build, customize, and run intelligent tools and assistants without writing a single line of code.

Key features include:

  • High performance: Achieves top-tier results on the GAIA benchmark, rivaling advanced deep research agents.
  • Effortless agent & workflow creation: Build tools, agents, and workflows through simple natural language prompts—no coding required.
  • Agentic-RAG with native vector database: Comes with a self-managing vector database, offering superior retrieval compared to traditional solutions like LangChain.
  • Broad LLM compatibility: Integrates seamlessly with leading models such as OpenAI, Anthropic, DeepSeek, vLLM, Grok, Hugging Face, and more.
  • Flexible interaction modes: Supports both function-calling and ReAct-style reasoning for versatile use cases.

Lightweight & extensible: A dynamic personal AI assistant that’s easy to customize and extend while remaining resource-efficient.

The post appeared first on .

Read More

Software Frameworks Optimized for GPUs in AI: CUDA, ROCm, Triton, TensorRT—Compiler Paths and Performance Implications


Table of contents

Deep-learning throughput hinges on how effectively a compiler stack maps tensor programs to GPU execution: thread/block schedules, memory movement, and instruction selection (e.g., Tensor Core MMA pipelines). In this article we will focus on four dominant stacks—CUDA, ROCm, Triton, and TensorRT—from the compiler’s perspective and explains which optimizations move the needle in practice.

What actually determines performance on modern GPUs

Across vendors, the same levers recur:

  • Operator scheduling & fusion: reduce kernel launches and round-trips to HBM; expose longer producer→consumer chains for register/shared-memory reuse. TensorRT and cuDNN “runtime fusion engines” exemplify this for attention and conv blocks.
  • Tiling & data layout: match tile shapes to Tensor Core/WGMMA/WMMA native fragment sizes; avoid shared-memory bank conflicts and partition camping. CUTLASS documents warp-level GEMM tiling for both Tensor Cores and CUDA cores.
  • Precision & quantization: FP16/BF16/FP8 for training/inference; INT8/INT4 (calibrated or QAT) for inference. TensorRT automates calibration and kernel selection under these precisions.
  • Graph capture & runtime specialization: graph execution to amortize launch overheads; dynamic fusion of common subgraphs (e.g., attention). cuDNN 9 added graph support for attention fusion engines.
  • Autotuning: search tile sizes, unroll factors, and pipelining depths per arch/SKU. Triton and CUTLASS expose explicit autotune hooks; TensorRT performs builder-time tactic selection.

With that lens, here’s how each stack implements the above.

CUDA: nvcc/ptxas, cuDNN, CUTLASS, and CUDA Graphs

Compiler path. CUDA code compiles through nvcc into PTX, then ptxas lowers PTX to SASS (arch-specific machine code). Controlling optimization requires feeding flags to both host and device phases; for kernels the key is -Xptxas. Developers often miss that -O3 alone affects only host code.

Kernel generation & libraries.

  • CUTLASS provides parametric templates for GEMM/conv, implementing warp-level tiling, Tensor Core MMA pipelines, and smem iterators designed for conflict-free access—canonical references for writing peak kernels, including Hopper’s WGMMA path.
  • cuDNN 9 introduced runtime fusion engines (notably for attention blocks), native CUDA Graph integration for those engines, and updates for new compute capabilities—materially reducing dispatch overheads and improving memory locality in Transformer workloads.

Performance implications.

  • Moving from unfused PyTorch ops to cuDNN attention fusion typically cuts kernel launches and global memory traffic; combined with CUDA Graphs, it reduces CPU bottlenecks in short-sequence inference.
  • On Hopper/Blackwell, aligning tile shapes to WGMMA/Tensor Core native sizes is decisive; CUTLASS tutorials quantify how mis-sized tiles waste tensor-core throughput.

When CUDA is the right tool. You need maximum control over instruction selection, occupancy, and smem choreography; or you’re extending kernels beyond library coverage while staying on NVIDIA GPUs.

ROCm: HIP/Clang toolchain, rocBLAS/MIOpen, and the 6.x series

Compiler path. ROCm uses Clang/LLVM to compile HIP (CUDA-like) into GCN/RDNA ISA. The 6.x series has focused on perf and framework coverage; release notes track component-level optimizations and HW/OS support.

Libraries and kernels.

  • rocBLAS and MIOpen implement GEMM/conv primitives with arch-aware tiling and algorithm selection similar in spirit to cuBLAS/cuDNN. The consolidated changelog highlights iterative perf work across these libraries.
  • Recent ROCm workstream includes better Triton enablement on AMD GPUs, enabling Python-level kernel authoring while still lowering through LLVM to AMD backends.

Performance implications.

  • On AMD GPUs, matching LDS (shared memory) bank widths and vectorized global loads to matrix tile shapes is as pivotal as smem bank alignment on NVIDIA. Compiler-assisted fusion in frameworks (e.g., attention) plus library autotuning in rocBLAS/MIOpen typically closes a large fraction of the gap to handwritten kernels, contingent on architecture/driver. Release documentation indicates continuous tuner improvements in 6.0–6.4.x.

When ROCm is the right tool. You need native support and optimization on AMD accelerators, with HIP portability from existing CUDA-style kernels and a clear LLVM toolchain.

Triton: a DSL and compiler for custom kernels

Compiler path. Triton is a Python-embedded DSL that lowers via LLVM; it handles vectorization, memory coalescing, and register allocation while giving explicit control over block sizes and program IDs. Build docs show the LLVM dependency and custom builds; NVIDIA’s developer materials discuss Triton’s tuning for newer architectures (e.g., Blackwell) with FP16/FP8 GEMM improvements.

Optimizations.

  • Autotuning over tile sizes, num_warps, and pipelining stages; static masking for boundary conditions without scalar fallbacks; shared-memory staging and software pipelining to overlap global loads with compute.
  • Triton’s design aims to automate the error-prone parts of CUDA-level optimization while leaving block-level tiling choices to the author; the original announcement outlines that separation of concerns.

Performance implications.

  • Triton shines when you need a fused, shape-specialized kernel outside library coverage (e.g., bespoke attention variants, normalization-activation-matmul chains). On modern NVIDIA parts, vendor collabs report architecture-specific improvements in the Triton backend, reducing the penalty versus CUTLASS-style kernels for common GEMMs.

When Triton is the right tool. You want near-CUDA performance for custom fused ops without writing SASS/WMMA, and you value Python-first iteration with autotuning.

TensorRT (and TensorRT-LLM): builder-time graph optimization for inference

Compiler path. TensorRT ingests ONNX or framework graphs and emits a hardware-specific engine. During the build, it performs layer/tensor fusion, precision calibration (INT8, FP8/FP16), and kernel tactic selection; best-practice docs describe these builder phases. TensorRT-LLM extends this with LLM-specific runtime optimizations.

Optimizations.

  • Graph-level: constant folding, concat-slice canonicalization, conv-bias-activation fusion, attention fusion.
  • Precision: post-training calibration (entropy/percentile/mse) and per-tensor quantization, plus smooth-quant/QAT workflows in TensorRT-LLM.
  • Runtime: paged-KV cache, in-flight batching, and scheduling for multi-stream/multi-GPU deployments (TensorRT-LLM docs).

Performance implications.

  • The largest wins typically come from: end-to-end INT8 (or FP8 on Hopper/Blackwell where supported), removing framework overhead via a single engine, and aggressive attention fusion. TensorRT’s builder produces per-arch engine plans to avoid generic kernels at runtime.

When TensorRT is the right tool. Production inference on NVIDIA GPUs where you can pre-compile an optimized engine and benefit from quantization and large-graph fusion.

Practical guidance: choosing and tuning the stack

  1. Training vs. inference.
    • Training/experimental kernels → CUDA + CUTLASS (NVIDIA) or ROCm + rocBLAS/MIOpen (AMD); Triton for custom fused ops.
    • Production inference on NVIDIA → TensorRT/TensorRT-LLM for global graph-level gains.
  2. Exploit architecture-native instructions.
    • On NVIDIA Hopper/Blackwell, ensure tiles map to WGMMA/WMMA sizes; CUTLASS materials show how warp-level GEMM and smem iterators should be structured.
    • On AMD, align LDS usage and vector widths to CU datapaths; leverage ROCm 6.x autotuners and Triton-on-ROCm for shape-specialized ops.
  3. Fuse first, then quantize.
    • Kernel/graph fusion reduces memory traffic; quantization reduces bandwidth and increases math density. TensorRT’s builder-time fusions plus INT8/FP8 often deliver multiplicative gains.
  4. Use graph execution for short sequences.
    • CUDA Graphs integrated with cuDNN attention fusions amortize launch overheads in autoregressive inference.
  5. Treat compiler flags as first-class.
    • For CUDA, remember device-side flags: example, -Xptxas -O3,-v (and -Xptxas -O0 when diagnosing). Host-only -O3 isn’t sufficient.

References:

The post appeared first on .

Read More
UT Austin and ServiceNow Research Team Releases AU-Harness: An Open-Source Toolkit for Holistic Evaluation of Audio LLMs

UT Austin and ServiceNow Research Team Releases AU-Harness: An Open-Source Toolkit for Holistic Evaluation of Audio LLMs


Voice AI is becoming one of the most important frontiers in multimodal AI. From intelligent assistants to interactive agents, the ability to understand and reason over audio is reshaping how machines engage with humans. Yet while models have grown rapidly in capability, the tools for evaluating them have not kept pace. Existing benchmarks remain fragmented, slow, and narrowly focused, often making it difficult to compare models or test them in realistic, multi-turn settings.

To address this gap, UT Austin and ServiceNow Research Team has released AU-Harness, a new open-source toolkit built to evaluate Large Audio Language Models (LALMs) at scale. AU-Harness is designed to be fast, standardized, and extensible, enabling researchers to test models across a wide range of tasks—from speech recognition to complex audio reasoning—within a single unified framework.

Why do we need a new audio evaluation framework?

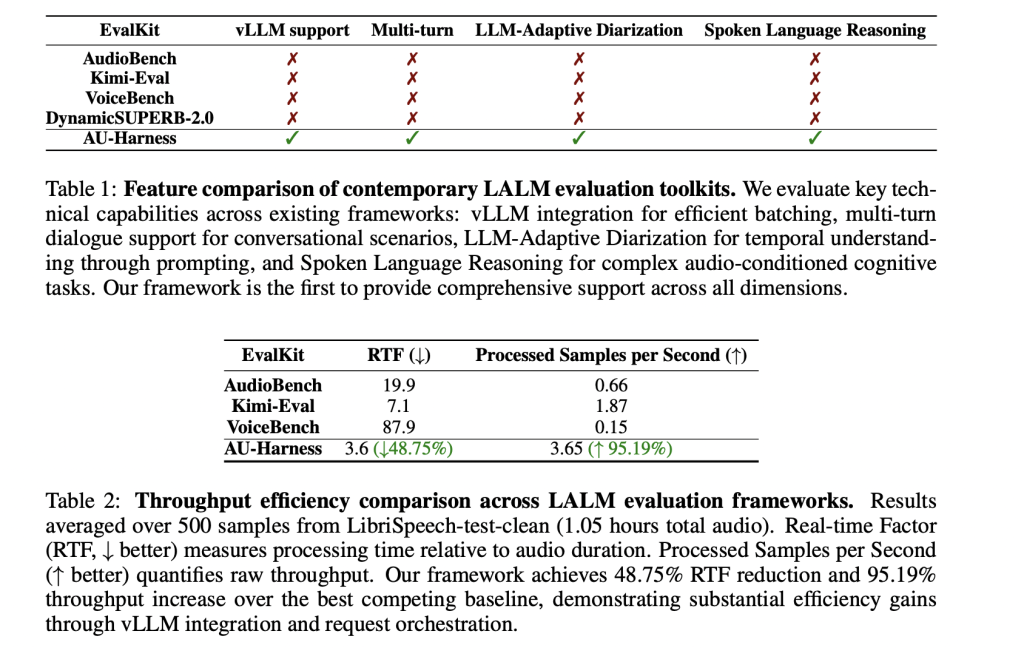
Current audio benchmarks have focused on applications like speech-to-text or emotion recognition. Frameworks such as AudioBench, VoiceBench, and DynamicSUPERB-2.0 broadened coverage, but they left some really critical gaps.

Three issues stand out. First is throughput bottlenecks: many toolkits don’t take advantage of batching or parallelism, making large-scale evaluations painfully slow. Second is prompting inconsistency, which makes results across models hard to compare. Third is restricted task scope: key areas like diarization (who spoke when) and spoken reasoning (following instructions delivered in audio) are missing in many cases.

These gaps limit the progress of LALMs, especially as they evolve into multimodal agents that must handle long, context-heavy, and multi-turn interactions.

https://arxiv.org/pdf/2509.08031

How does AU-Harness improve efficiency?

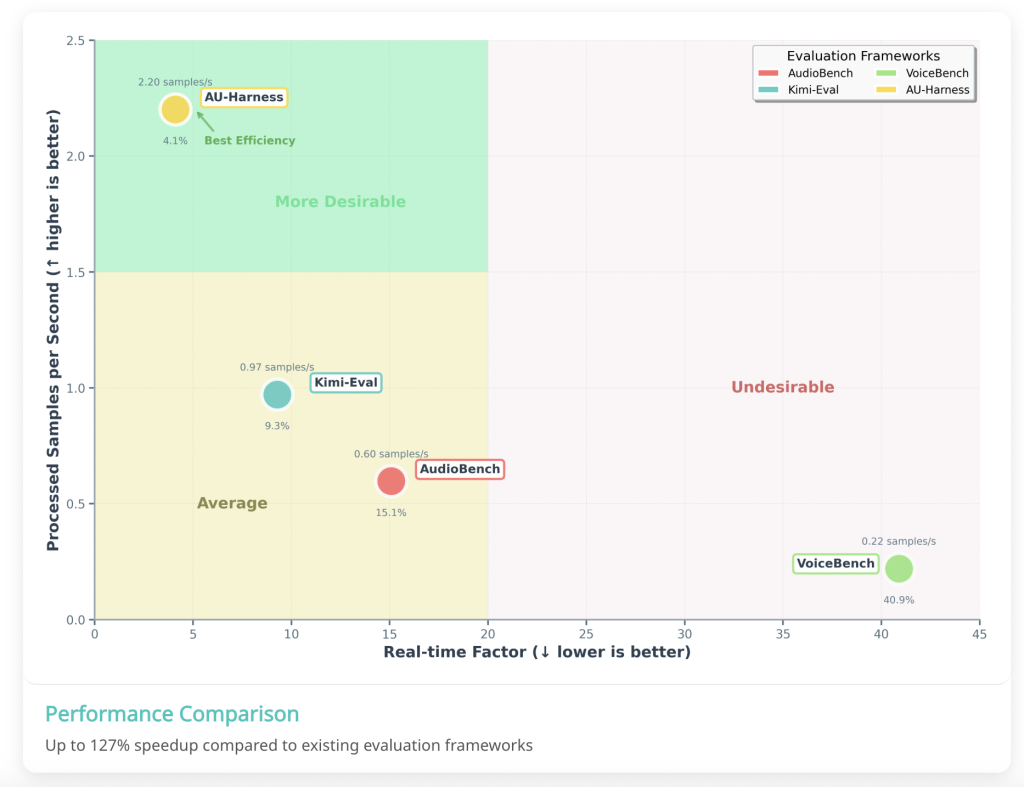
The research team designed AU-Harness with focus on speed. By integrating with the vLLM inference engine, it introduces a token-based request scheduler that manages concurrent evaluations across multiple nodes. It also shards datasets so that workloads are distributed proportionally across compute resources.

This design allows near-linear scaling of evaluations and keeps hardware fully utilized. In practice, AU-Harness delivers 127% higher throughput and reduces the real-time factor (RTF) by nearly 60% compared to existing kits. For researchers, this translates into evaluations that once took days now completing in hours.

Can evaluations be customized?

Flexibility is another core feature of AU-Harness. Each model in an evaluation run can have its own hyperparameters, such as temperature or max token settings, without breaking standardization. Configurations allow for dataset filtering (e.g., by accent, audio length, or noise profile), enabling targeted diagnostics.

Perhaps most importantly, AU-Harness supports multi-turn dialogue evaluation. Earlier toolkits were limited to single-turn tasks, but modern voice agents operate in extended conversations. With AU-Harness, researchers can benchmark dialogue continuity, contextual reasoning, and adaptability across multi-step exchanges.

What tasks does AU-Harness cover?

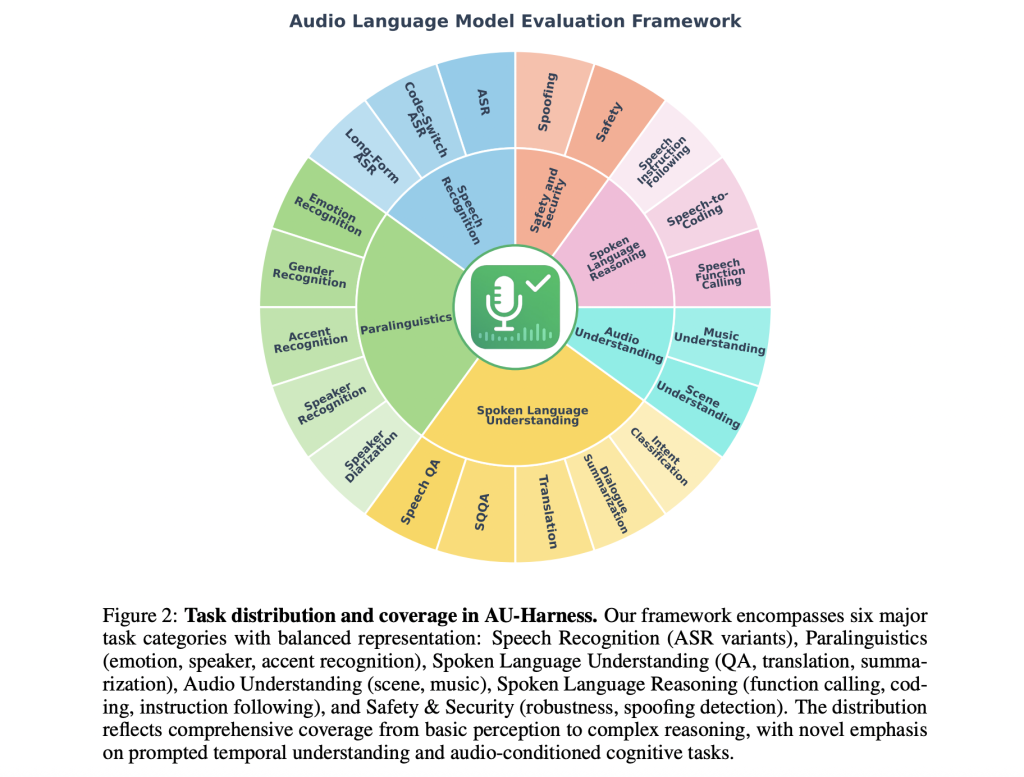
AU-Harness dramatically expands task coverage, supporting 50+ datasets, 380+ subsets, and 21 tasks across six categories:

  • Speech Recognition: from simple ASR to long-form and code-switching speech.
  • Paralinguistics: emotion, accent, gender, and speaker recognition.
  • Audio Understanding: scene and music comprehension.
  • Spoken Language Understanding: question answering, translation, and dialogue summarization.
  • Spoken Language Reasoning: speech-to-coding, function calling, and multi-step instruction following.
  • Safety & Security: robustness evaluation and spoofing detection.

Two innovations stand out:

  • LLM-Adaptive Diarization, which evaluates diarization through prompting rather than specialized neural models.
  • Spoken Language Reasoning, which tests models’ ability to process and reason about spoken instructions, rather than just transcribe them.
https://arxiv.org/pdf/2509.08031

What do the benchmarks reveal about today’s models?

When applied to leading systems like GPT-4o, Qwen2.5-Omni, and Voxtral-Mini-3B, AU-Harness highlights both strengths and weaknesses.

Models excel at ASR and question answering, showing strong accuracy in speech recognition and spoken QA tasks. But they lag in temporal reasoning tasks, such as diarization, and in complex instruction-following, particularly when instructions are given in audio form.

A key finding is the instruction modality gap: when identical tasks are presented as spoken instructions instead of text, performance drops by as much as 9.5 points. This suggests that while models are adept at processing text-based reasoning, adapting those skills to the audio modality remains an open challenge.

https://arxiv.org/pdf/2509.08031

Summary

AU-Harness marks an important step toward standardized and scalable evaluation of audio language models. By combining efficiency, reproducibility, and broad task coverage—including diarization and spoken reasoning—it addresses the long-standing gaps in benchmarking voice-enabled AI. Its open-source release and public leaderboard invite the community to collaborate, compare, and push the boundaries of what voice-first AI systems can achieve.


Check out the , and . Feel free to check out our . Also, feel free to follow us on  and don’t forget to join our  and Subscribe to .

The post appeared first on .

Read More
Meta AI Released MobileLLM-R1: A Edge Reasoning Model with less than 1B Parameters and Achieves 2x–5x Performance Boost Over Other Fully Open-Source AI Models

Meta AI Released MobileLLM-R1: A Edge Reasoning Model with less than 1B Parameters and Achieves 2x–5x Performance Boost Over Other Fully Open-Source AI Models


Table of contents

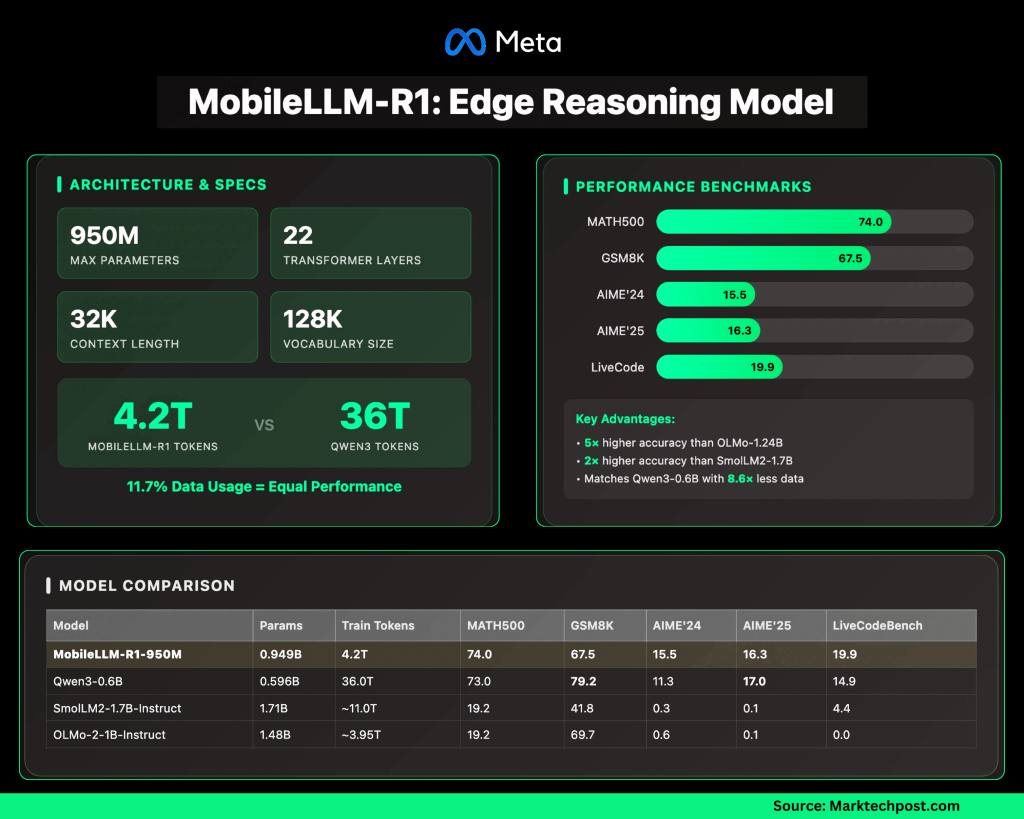
Meta has released MobileLLM-R1, a family of lightweight edge reasoning models now available on . The release includes models ranging from 140M to 950M parameters, with a focus on efficient mathematical, coding, and scientific reasoning at sub-billion scale.

Unlike general-purpose chat models, MobileLLM-R1 is designed for edge deployment, aiming to deliver state-of-the-art reasoning accuracy while remaining computationally efficient.

What architecture powers MobileLLM-R1?

The largest model, MobileLLM-R1-950M, integrates several architectural optimizations:

  • 22 Transformer layers with 24 attention heads and 6 grouped KV heads.
  • Embedding dimension: 1536; hidden dimension: 6144.
  • Grouped-Query Attention (GQA) reduces compute and memory.
  • Block-wise weight sharing cuts parameter count without heavy latency penalties.
  • SwiGLU activations improve small-model representation.
  • Context length: 4K for base, 32K for post-trained models.
  • 128K vocabulary with shared input/output embeddings.

The emphasis is on reducing compute and memory requirements, making it suitable for deployment on constrained devices.

How efficient is the training?

MobileLLM-R1 is notable for data efficiency:

  • Trained on ~4.2T tokens in total.
  • By comparison, Qwen3’s 0.6B model was trained on 36T tokens.
  • This means MobileLLM-R1 uses only ≈11.7% of the data to reach or surpass Qwen3’s accuracy.
  • Post-training applies supervised fine-tuning on math, coding, and reasoning datasets.

This efficiency translates directly into lower training costs and resource demands.

How does it perform against other open models?

On benchmarks, MobileLLM-R1-950M shows significant gains:

  • MATH (MATH500 dataset): ~5× higher accuracy than Olmo-1.24B and ~2× higher accuracy than SmolLM2-1.7B.
  • Reasoning and coding (GSM8K, AIME, LiveCodeBench): Matches or surpasses Qwen3-0.6B, despite using far fewer tokens.

The model delivers results typically associated with larger architectures while maintaining a smaller footprint.

Where does MobileLLM-R1 fall short?

The model’s focus creates limitations:

  • Strong in math, code, and structured reasoning.
  • Weaker in general conversation, commonsense, and creative tasks compared to larger LLMs.
  • Distributed under FAIR NC (non-commercial) license, which restricts usage in production settings.
  • Longer contexts (32K) raise KV-cache and memory demands at inference.

How does MobileLLM-R1 compare to Qwen3, SmolLM2, and OLMo?

Performance snapshot (post-trained models):

Model Params Train tokens (T) MATH500 GSM8K AIME’24 AIME’25 LiveCodeBench
MobileLLM-R1-950M 0.949B 4.2 74.0 67.5 15.5 16.3 19.9
Qwen3-0.6B 0.596B 36.0 73.0 79.2 11.3 17.0 14.9
SmolLM2-1.7B-Instruct 1.71B ~11.0 19.2 41.8 0.3 0.1 4.4
OLMo-2-1B-Instruct 1.48B ~3.95 19.2 69.7 0.6 0.1 0.0

Key observations:

  • R1-950M matches Qwen3-0.6B in math (74.0 vs 73.0) while requiring ~8.6× fewer tokens.
  • Performance gaps vs SmolLM2 and OLMo are substantial across reasoning tasks.
  • Qwen3 maintains an edge in GSM8K, but the difference is small compared to the training efficiency advantage.

Summary

Meta’s MobileLLM-R1 underscores a trend toward smaller, domain-optimized models that deliver competitive reasoning without massive training budgets. By achieving 2×–5× performance gains over larger open models while training on a fraction of the data, it demonstrates that efficiency—not just scale—will define the next phase of LLM deployment, especially for math, coding, and scientific use cases on edge devices.


Check out the . Feel free to check out our . Also, feel free to follow us on  and don’t forget to join our  and Subscribe to .

The post appeared first on .

Read More